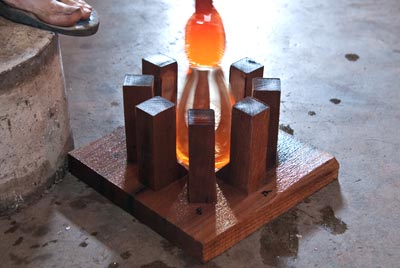

This is an easy way to construct moulds for blowing glasses or vases or stuff like that. It gets more complicated if the shape has undercuts because it won’t pull straight out, so the mould has to split apart. It’s best to use solid wood if you can. Next best is plywood. The worst is particle board and MDF because the glue in it contains formaldehyde, so when it burns, it makes toxic smoke (same with the plywood, just much less glue involved). This style mould is inspired by old Czech moulds. In the moulds I’ve seen, the slats were thinner, around 1/2″, but 3/4″ thick slats will also work and are easier to screw onto the base board.
The first thing to do is create a template of the shape you want to create. Then you mark out the profile onto the wood and cut the individual slats on a band saw or scroll saw as perfectly as you can. The slats are screwed to a base board, using the template to make sure the spacing is correct. The screws come up into the slats from below, and should be countersunk into the base so the mould sits flat on the ground. All holes in the slats should be pre-drilled so the wood doesn’t split.
I say this is an easy way to make a glass mould because the alternatives are a lot more work. You can turn a positive shape out of plaster, on a potter’s wheel, by cutting in with an aluminum template that has the profile cut into it. From there you coat it in shellac and cast a plaster positive, then split the form, remove the original, and drill some air holes. Another way is to use a wood lathe and cut the shape out of the inside of a chunk of wood (fruit wood, like pear or apple works well), but hollowing out the wood like that is really damn hard to do without the right tools and a lot of experience. For more production scale glass blowing, the mould would be made of graphite, which is the best and longest lasting way to go about it, but a chunk of graphite is expensive and machining it is a bit complicated.


I made the original mould for this glass a few years ago in copenhagen and blew a lot of them, but today I only have one with me and I’m always worried about breaking it. It’s a special glass because my mentor, Charlie Meaker blew it, and there will never be another one quite as nice.

Before blowing, the mould needs to soak up water. If it hasn’t been soaking in water, it will just burn up.
The blowing is done after collecting a few gathers of glass onto a blow pipe, blowing a bubble, necking in with the jacks, and then blowing down into the mould and turning.


The first few pieces that come out of the mould won’t be perfect, but as it burns in, any imperfections in the slats will be burned away, they will form a layer of carbon, and the rest of the pieces should be relatively round. A mould like this will last for a while, easily making 50-100 or more pieces. It’s dunked in water every time it’s blown and should be kept wet when not being used.
The next step for these pieces will be to cut the tops off and cold work the rim until it’s polished. The shape is a bit wider than it was supposed to be so they might get lids and become storage containers or they’ll get filled with dirt and I’ll put plants in them.